The APC AP7900B 8-Outlet 120V x 15A Switched Rack 1U PDU with rack ears is a powerful tool for home lab enthusiasts seeking cost-effective, enterprise-grade power management. After a costly lesson from leaving my servers running unnecessarily last year, I turned to this reliable PDU to optimize my setup. This guide provides a step-by-step process for configuring the APC AP7900B, interwoven with personal anecdotes and insights into why this $100–$150 investment for a used unit is a must-have for home lab power management. Notably, the initial serial console setup is a one-time task, after which you’ll primarily use the web UI or SSH for management.

Why I chose a PDU: An $1800 wake-up call
A few years ago, I left some of my home lab servers—a mix of Dell PowerEdge R620s and a R720—running 24/7, even when idle. With solar power at home, I assumed my energy costs were minimal. However, at the end of my solar agreement’s fiscal year, I was shocked by an $1800 true-up bill from my utility provider. I usually pay $200-400 a year after solar for electricity. This prompted me to rethink power management. While Baseboard Management Controllers (BMCs) allow remote server power control, my managed network switches lacked this feature, with fans constantly running. The APC AP7900B, a used enterprise-grade PDU, offered advanced power control at a fraction of the cost of new models, which can cost thousands.
The value of used enterprise PDUs
Enterprise equipment like the APC AP7900B is built to withstand years of use, often outlasting its official support lifecycle. Hyperscalers and businesses decommission such gear when it reaches end-of-life (EOL) or loses vendor support, making it available at steep discounts—often $100–$150 on secondary markets like eBay. Despite being “outdated,” these PDUs usually remain fully functional, offering robust features for home labs. The AP7900B is a 15A model, suitable for standard 120V circuits. Higher-capacity 20A versions exist but may require specialized 20A outlets and fuses, which I avoided for simplicity.
Prerequisites for an APC AP7900B setup
Before starting, ensure you have:
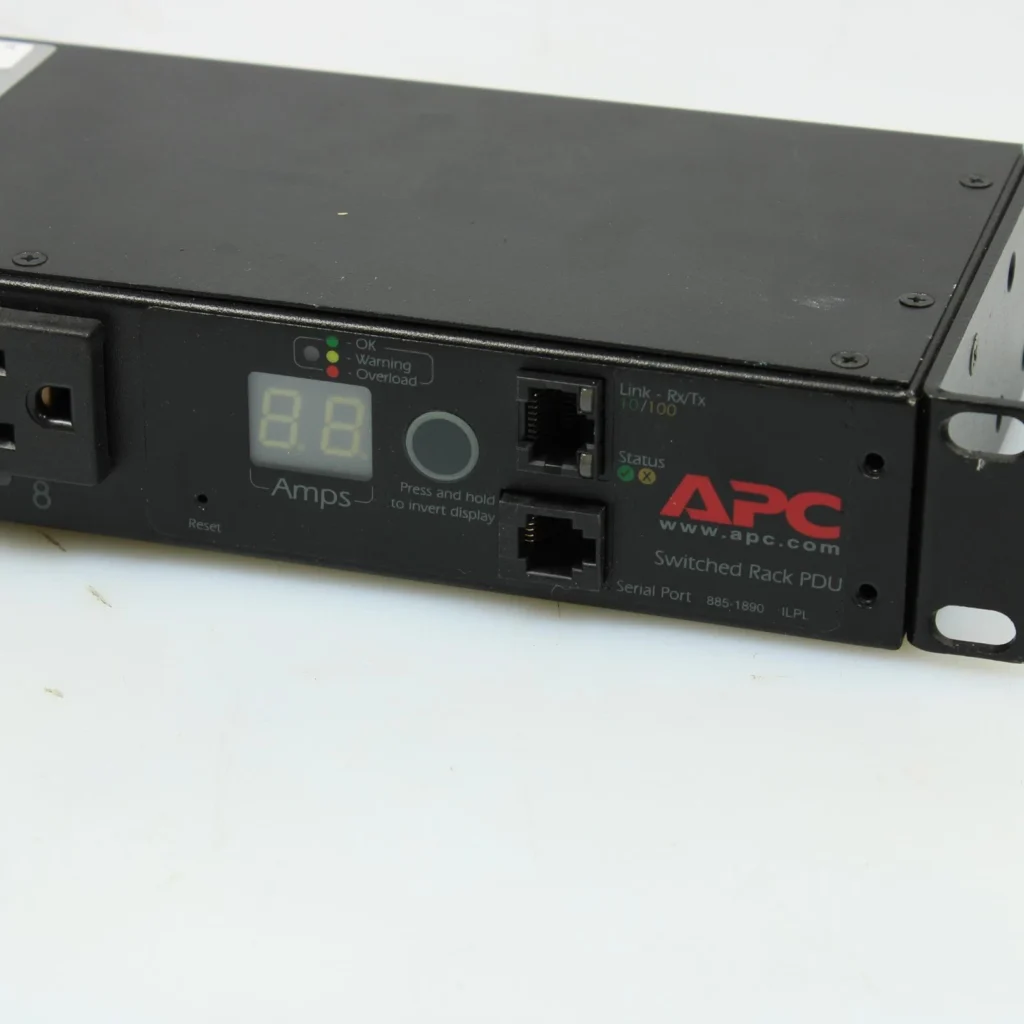
- APC AP7900B PDU installed in your rack with rack ears.
- RJ-45 Ethernet cable for network connectivity.
- RJ-12 to DB9 serial cable (purchased from Amazon, as serial ports are rare in modern setups).
- Computer with a terminal emulator (e.g., minicom for Linux/macOS or PuTTY for Windows).
- Network details: A static IP address, subnet mask, gateway, and DNS servers.
- Access to APC’s website for firmware downloads (https://www.apc.com).
Step 1: Physical setup and rediscovering serial ports
Mounting the PDU was straightforward—its rack ears ensured a secure fit in my 1U rack space. However, I was surprised to learn that initial configuration required a serial connection, as SSH and the web interface are disabled by default. Having not used a serial port in decades, I felt a nostalgic rush purchasing a DB9 to RJ-12 cable from Amazon and setting up minicom, reminiscent of early computing days. Fortunately, this serial setup is a one-time process—once configured, you’ll likely manage the PDU via the web UI or SSH.
- Mount the PDU: Secure the AP7900B in your rack, ensuring proper alignment.
- Connect Cables:
- Plug the RJ-45 Ethernet cable into the PDU’s console port (“IOIOI”) and connect to your switch/router.
- Connect the RJ-12 to DB9 serial cable from the PDU’s serial port (“1”) to your computer or a USB-to-serial adapter if you don’t have a serial port—I have them on my 12-gen and 14-gen Dell servers.
Step 2: Accessing the PDU via the serial console
Using minicom brought back memories of terminal servers, but it was effective for the initial setup.
- Set Up Minicom (Linux/macOS):
- Install minicom: sudo apt-get install minicom (Ubuntu/Debian), sudo dnf install (Fedora/RHEL/Rocky), or brew install minicom (macOS).
- Launch: minicom -s.
- Configure:
- Serial Device: /dev/ttyS0 or /dev/ttyUSB0 (for USB adapters).
- Baud Rate: 9600, Data Bits: 8, Parity: None, Stop Bits: 1, Flow Control: None.
- Save and connect.
- Log In:
- Press Enter for the login prompt.
- Use default credentials: Username: apc, Password: apc.
- For security, change the default password after login (see Step 6).
- Reset to factory settings if credentials fail (see user manual).
Step 3: Configuring network settings for remote access
With serial access, I assigned a static IP to enable remote management.
- Access Network Settings: Navigate to Network > TCP/IP Configuration.
- Set Static IP:
- Select Manual configuration.
- Enter your chosen IP address, subnet mask, gateway, and DNS (e.g., 8.8.8.8).
- Save and reboot if prompted.
- Verify: Confirm the IP via the console and ping the address from another device.
- Reserve the IP: If you select an IP address from within the DHCP range, configure your router to map the DPU’s mac address to the selected IP address so that other devices within the network do not receive that IP address.
Step 4: Enabling SSH for remote PDU control
SSH access was essential for managing switches without BMC-like functionality.
- Enable SSH:
- Go to Administration > Network > Console.
- Enable SSHv2 and save.
- Test SSH:
- Run: ssh apc@<your-PDU-IP>.
- If errors occur (e.g., “no matching host key type”), update the firmware (Step 5).
Step 5: Updating firmware for modern compatibility
For one of the PDUs I purchaesd, the PDU’s older firmware (e.g., v6.4.6) caused SSH compatibility issues. Updating to the latest version resolved this.
- Check Firmware: Go to Administration > General > About.
- Download Firmware: Find the latest version (e.g., v7.x.x) at https://www.apc.com.
- Update via FTP:
- Enable FTP: Administration > Network > FTP Server.
- Use an FTP client to upload the firmware to your PDU’s IP.
- Follow console prompts to update and reboot.
- Verify: Check the new firmware version and retest SSH.
Step 6: Leveraging APC AP7900B features
The APC AP7900B is more than a rack-mountable power strip—it’s a smart device with robust features:
- Individual Outlet Control: Turn outlets on/off via SSH or the web UI, ideal for powering down idle switches.
- Outlet Naming: Assign names (e.g., “Core Switch,” “NAS”) in the UI for clarity.
- Notifications: Set up email/SNMP alerts for power events.
- User Management: Configure local and remote users with varying access levels.
- Firewall Configuration: Restrict access to specific IPs, enhancing security for public IP mapping or private LAN access.
- Power Monitoring: Track energy usage to optimize consumption and avoid high utility bills.
- Scheduling: Program outlets to turn on/off at specific times, further reducing energy waste.
For remote access, at one point I mapped my PDU to a public IP with a secure login (changed from the default apc/apc for safety). This allowed seamless power management from anywhere, complementing BMC controls for servers. This comes with some risks, but from time to time I find it convenient to set this up temporarily when I’m working remotely.
Step 7: Final setup and rack mobility
- Enable Web Interface: Go to Administration > Network > Web/SSL, enable HTTPS, and access at https://<your-PDU-IP>.
- Test Outlets: Toggle outlets to confirm control over connected devices.
- Secure the PDU: Change the default apc/apc credentials via Administration > Security > Local Users to enhance security.
- Rack Mobility: With the PDU rack-mounted, moving my wheeled rack only requires unplugging the PDU’s power cable and network uplinks, keeping the setup clean and portable.
Troubleshooting tips for the APC AP7900B
- Serial Issues: Verify the cable and port. Ensure the RJ-12 is in the “1” port.
- SSH Failure: If issues persist post-firmware update, try ssh -o HostKeyAlgorithms=ssh-rsa apc@<your-PDU-IP>.
- Network Problems: Check the console port (“IOIOI”) and switch/router settings.
Conclusion: Cost-effective and intelligent power management solutions for home labs
The APC AP7900B transformed my home lab, delivering enterprise-grade power management for just $100–$150. Paired with BMC controls, it simplifies data center management, enabling precise control over servers and switches. Its rack-mountable design streamlines rack mobility, and its advanced features—like outlet naming, notifications, and firewall settings—ensure efficiency and security. The serial console setup, though initially daunting, is a one-time task, after which the intuitive web UI or SSH makes management a breeze. For home labbers looking to optimize power usage and avoid costly utility bills, this PDU is a budget-friendly powerhouse. Share your PDU tips or questions in the comments!
Leave a Reply